This post hopes to explain some key aspects of developing on the Meta Quest 1, 2 &3 (and similar devices such as the Pico 4) from a technical artistic standpoint. It will contain a series of best practices, common pitfalls and useful context.
Unless otherwise stated, the term “Quest” will be used interchangeably for Meta Quest 1, 2 & 3 and any other mobile VR headset. The features from headset-to-headset may vary, but the fundamental architecture and platform is the same. These guidelines apply broadly too all mobile VR headsets, such as Pico 4.
We’ll start pretty technical to give a solid understanding of context, then we’ll move into practical advice further on.
Technical Performance Overview
You cannot ship on the Quest store unless you are hitting 72fps* consistently (equivalent to 13.8ms per frame). Therefore, the framerate should always be prioritised over artistic fidelity, if you are outside the frametime budgets. You should encourage individual responsibility for the performance impacts of changes made to your project.
The Meta Quest uses a mobile chipset. This has critical and important changes in comparison to more traditional desktop-class chipsets, in terms of the art pipeline and features. A mobile chipset is designed around power efficiency. As part of this, the architecture prioritises using smaller bandwidths when sending data to and from the CPU/GPU.
* Media apps can target 60fps
How the Quest Renders
Mobile VR has some important difference to traditional desktop rendering. Here is a quick breakdown:
- CPU sends a draw command to the GPU
- The GPU divides the image to be rendered into tiles, on Quest 2, this is about 135 tiles, 96*176 pixels each
- The GPU then “bins” everything to be drawn into the tiles, so that each tile has its own subset of draw instructions. One tile may contain no instructions if it empty, other tiles may contain the same mesh as each other
- The GPU then renders each tile.
- When all tiles are rendered, the GPU commits this to system memory. This is called a “resolve”, because we resolve the temporary buffer to fixed memory.
It is important to note that the GPU runs in a parallel way. This means that one tile may be running a vertex shader, another may be running a pixel shader at the same moment in time.
There are shaders that can “break” tiling, causing the GPU to render the entire image (“immediate mode rendering”), and not run in a tiled mode. We don’t usually encounter these, but custom geometry shaders can do this (so dynamic wrinkle maps are a non-starter).
Another consideration is that vertex-dense meshes can cause slowdowns, as it has to evaluate all of the vertices against all the tiles. If you have dense meshes, it may be better to break these down into smaller submeshes – as long as you don’t increase draw calls too much – it is a fine balancing act, but one that pays if you put in the effort.

Why is this important?
Mobile VR chipsets are designed to optimize power usage, so you don’t run out of battery after 20 minutes. To do this, they have very small amounts of memory bandwidth, as this is power efficient.
The knock-on effect of this, is that when the GPU and CPU are sending data, they can only do so in small packets of data (hence, the use of tiles).
When we “resolve”, the headset is transferring a very large image from GPU to CPU and exceeds the available memory bandwidth. This causes a stall on the device (from 1-2ms for a full screen image), where you are doing no processing.
Let’s go a bit deeper into that Resolve, its important we have a really clear understanding:
Resolve Cost
We have established that the smaller bandwidth available can cause a stall with large images. A resolve cost is roughly 1-2ms, which is 1/7th of your entire frame budget, and so reducing the total resolve cost is critical to your performance, and therefore, your ability to ship your VR project.
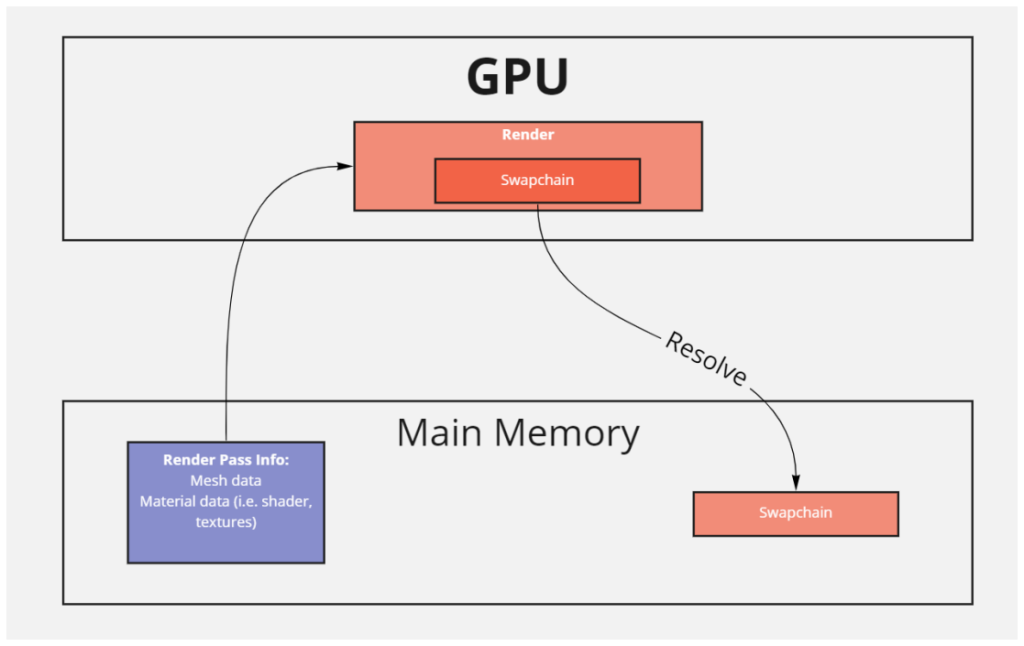
As the device has to render to the screen at least once, you are already paying a single resolve cost before anything else has happened.
A resolve cost is always an “additional” cost, for example, if you use it as a post processing pass, and your pass costs 3ms on its own, your total cost is 3ms pass + 2ms resolve, so 5ms total.
This resolve cost also makes using traditional Deferred Rendering impossible. For deferred rendering to happen, the GPU has to render out several GBuffers – in a minimal PBR workflow, these would be:
- Albedo
- Metallic/Smoothness or Roughness
- Normals
- Lighting Model
- Depth
- And, of course, the final blit pass
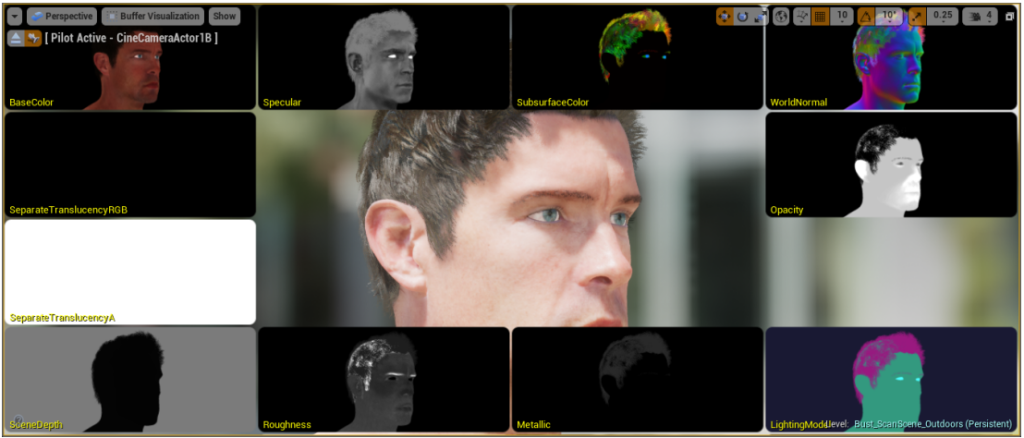
Deferred on a mobile VR headset is no – too many resolves!
(As an aside, we also don’t use deferred because we can’t get smooth anti-aliasing from MSAA. With deferred we have to use approximate techniques like TXAA and FXAA, which are nauseating and/or need extra buffers to work.)
This alone is 6 resolves, which is 12ms of your 13.8ms (87%) frame time budget before you have calculated anything (not even your gameplay or physics updates, or even run your actual GPU processing)! For this reason, Mobile Chipsets almost exclusively use Forward Rendering. Deferred Rendering can also create other issues in VR (that are outside the scope of this document).
All of the above is true for most mobile chipsets – though mobile phones can typically render at lower resolutions and framerates, and don’t have some nuances of VR that I will discuss next, so the cost to resolve is typically not a huge issue.
Subpasses
Up until fairly recently, Unity and Unreal Engine didn’t make use of Vulkan Subpasses when rendering – these features are now available in Unity 6+ with the URP and from the Oculus fork of UE 4.26.
Subpasses allows to get around quite a lot of the resolve issues mentioned above. In a nutshell, they allow multiple passes to be run across the tiles before we resolve them and store the final buffer. In more concrete terms, you can render your tile as you normally would, then pass it through a color-correction post effect before you store it – thereby avoiding the resolve cost.
The Oculus UE 4.26 Fork blog post on this is worth a read: https://developer.oculus.com/blog/graphics-showcase-using-vulkan-subpasses-in-ue4-for-performant-tone-mapping-on-quest/?locale=en_GB
As of writing, none of my projects have been using these versions (because I’m using Unity LTS, and subpasses aren’t in an LTS release yet), but you should look to make use of them if you can, as they can give you a bunch of effects without the resolve overhead.
Its worth noting that subpasses like this will not work on effects which require reading surrounding pixels, so bloom, blur, depth of field, screen-space effects will not work here.
Timewarp and Internal Frame Pacing
Now we go even more (?!) technical and juicy.
In the world of VR, there are many opportunities to inflict nausea on people. The reasons for this are mostly from two things:
- Inconsistencies between brain/eye coordination – i.e. low framerate or input latency
- Inconsistencies between brain/stomach coordination – i.e. your character falls in the world, but in real-life, your still standing.
The second issue here is all about comfort, and I only care about performance today, so we’ll focus on the top issue – framerate and latency!
In order to keep brain and eyes as happy friends, we need to deliver high framerates to the eyes, and they need to match what the brain senses is happening in the world.
To do this, mobile VR headsets have a feature that Meta dub “Timewarp”. This is a feature where it tracks your head movement for the duration of a frame, then at the end of a frame, it distorts the rendered image to match how much your head moved that frame. This prevents your eyes from being a frame behind your brain – its seamless, and its amazing and its free… but there are caveats.
To perform this operation, the headset requires a consistent frame time. This is partly why you will find you only have fixed framerates available on mobile VR headsets – 72, 90, 120.
Problems occur when your framerate is below your target framerate. If the headset doesn’t receive a frame when it is expecting to, it will wait for the next frame and perform Timewarp on that.
This means, if you had a target of 72fps, but only delivered at 55fps, the headset would be waiting for additional frames, more than just one or two – so your actual framerate will be reporting something like 32fps, even though the “true” framerate is closer to 55. (I hope that makes sense…)
We call this late frame a “stale frame”.
It also means the maths is harder to profile. It may look like you need 40fps to get from 32fps to 72fps – but in fact, you may only need 18fps to get from 55fps, back to 72fps. The “32fps” is a bit of a red herring here.
That resolve cost we mentioned above? That can also wreak havoc on your frame times. A post process pass for bloom might only take 1ms to compute, but add in all the resolve cost, and stale frames if you went below your target framerate, and you can go from 13ms per frame to 20ms per frame.
MSAA & Transparency
Let’s go one final layer down. I’ll copy about MSAA straight from ARM:
Multisample Anti-Aliasing (MSAA) is an anti-aliasing technique that is a more efficient variation of supersampling. Supersampling renders the image at a higher internal resolution before downscaling to the display resolution by performing fragment shading for every pixel at that higher resolution.
MSAA performs the vertex shading normally but then each pixel is divided into subsamples which are tested using a subsample bitwise coverage mask. If any subsamples pass this coverage test, fragment shading is then performed, and the result of the fragment shader is stored in each subsample which passed the coverage test.
By only executing the fragment shader once per pixel, MSAA is substantially more efficient than supersampling although it only mitigates geometric aliasing at the intersection of two triangles.
For VR applications the quality benefits from 4x MSAA far outweigh the cost and it should be used whenever possible. In particular, 4x MSAA reduces the “jaggies” caused by additional fragments that are generated along the edges of triangles.
Mali GPUs are designed for full fragment throughput when using 4x MSAA so it can be used with only a minor effect on performance.
This means MSAA should be on x4 all the time.
There is one consideration, however. If you are running multiple passes, i.e. for post processing, MSAA will be run on both passes. This exacerbates performance hits.
MSAA also opens a door to better transparency.
Transparency
Remember that tiled renderer? Its a very-optimized renderer – which is good for the most part – but it has issues with alpha clipping/masking.
When rendering a tile, if the GPU hits a “clip()” or “discard()” function, the GPU will discard the entire tile and start over, as its written in such a way as to not expect those commands.
The default Alpha Masking shader options in the BiRP (and very possibly Unreal, but I don’t know for sure) use those very clip & discard commands. As a result, they are too expensive on Quest to use. To illustrate: if you had a masked shader stretching across every tile (i.e., a full screen quad), you would draw your entire screen twice, as it discards every tile once. And it gets worse if you have several objects using it – each time it cause the tile to be re-rendered.
MSAA saves the day, however – it opens up the option of Alpha To Coverage. This is an excellent way of getting cheap alpha as it is practically free if you use MSAA (which you should be doing). Alpha to coverage takes advantage of the fact you’re already sampling a pixel multiple times with MSAA (i.e. 4x MSAA means each pixel is sampled 4 times). It computes 4 alpha values for each pixel and averages them out, applying this as an opacity value to an opaque render pass. It can result in some slight banding, but it solves sorting issues and is ‘free’ once enabled.

On a positive note – the latest URP versions for Unity 2023+ now use this as standard on supported platforms! ![]()
You can also use mesh to perform clipping-like effects – this is the cheapest way!

Practical Performance Advice
“What can we do about this? ![]() ”.
”.
The good news is that we can get around most problems – we just have to be a bit clever, and at times, a bit old-school.
When discussing post processing, we usually want a few things:
- Color Correction & Tonemapping
- Vignettes & Full Screen effects
- SSAO
- Screen Space Reflections
- Bloom
- Refraction
- Decals
Color Correction & Tonemapping
WIthout subpasses, color correction & tonemapping, using Unity’s Volume Component can add 4-5ms of frametime. We can get around this by putting the color correction code into the surface shader. The cost of doing this is usually small (0.5ms-1ms), but it depends on scene complexity as its a per-draw, per-pixel cost.
The downside to this approach is that it won’t work with Shader Graph shaders easily, as Unity doesn’t support low-level shader access (and don’t me started on Unreal).
Vignettes & Full Screen effects
For vignettes, damage overlays, you can simply attach a quad to the camera that uses a transparent texture & material. You should disable this when you don’t need it running as it creates a lot of overdraw – but it used wholesale in mobile VR games & apps.
SSAO
This is a no on mobile VR. We need a post effect pass as it has to read from existing frame data, that would require a resolve cost. You will have to rely on baked AO.
Screen Space Reflections
Same for SSR – however, for reflections, we can use parallax/box corrected cubemaps, and these look & work great.

The middle option is available to use in the URP
Bloom
Post processing bloom isn’t an option – due to cost, but here are some options you may want to investigate:
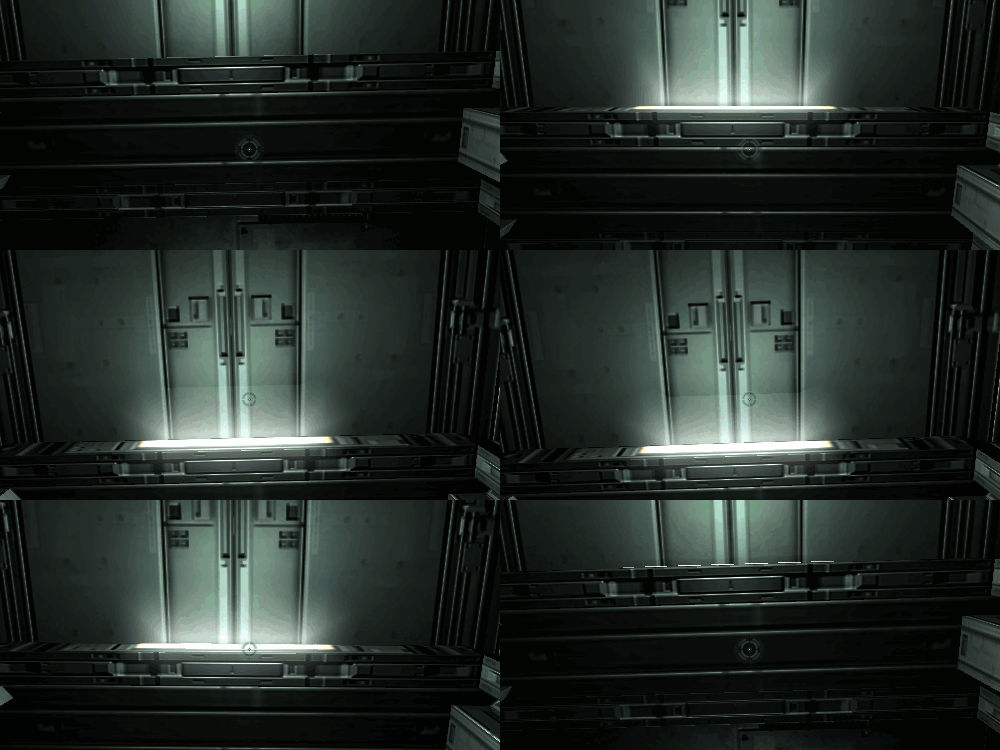
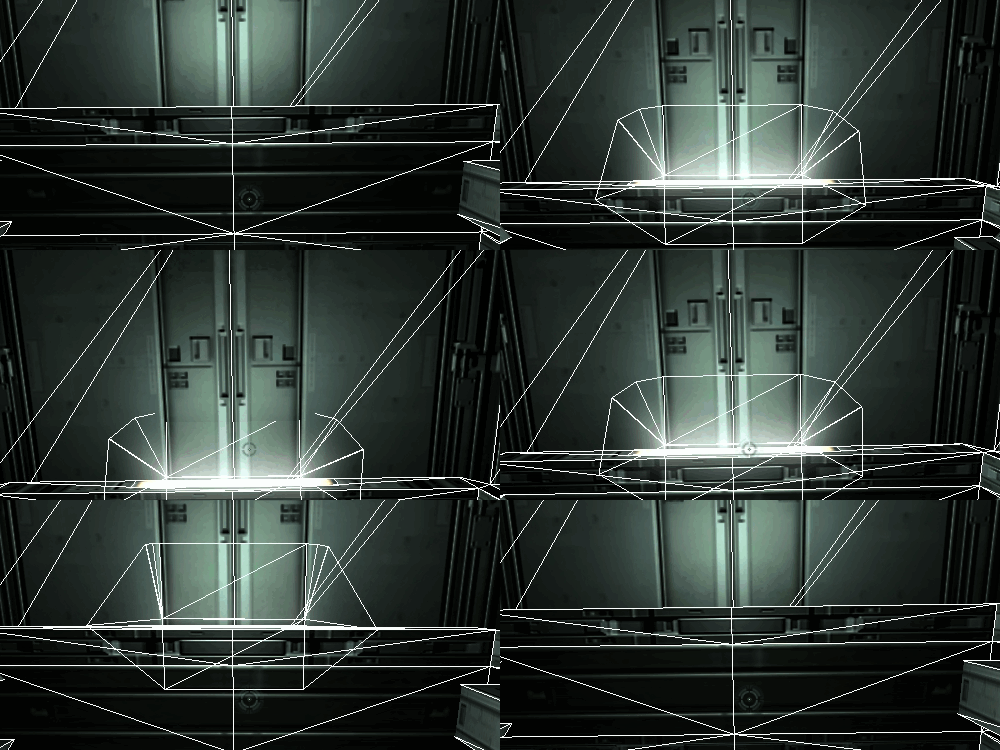
Doom 3 used a mesh system for its bloom:
Refraction
Although not a post process, it requires an opaque pass to be stored in order to have something to refract.
We can get around this by utilizing the aforementioned box-projected cubemaps – instead of reflecting the cubemap, we refract it.
Red Matter 2 used this approach well:

The drawback is that it can’t be dynamic to the environment – so it wont show characters through it – but it is still convincing.
Decals
Decals normally require screen-space information (a resolve ![]() ). But we can use mesh to achieve the same effect! There are several – though these only work with static decals, you cant make them at runtime:
). But we can use mesh to achieve the same effect! There are several – though these only work with static decals, you cant make them at runtime:
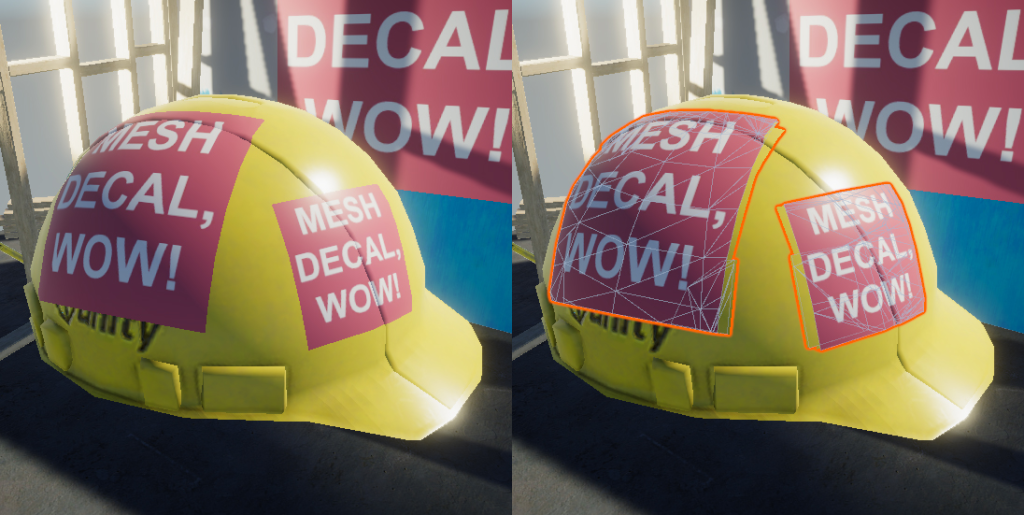
General Performance Advice
Draw Calls, Set Passes & Batching (& Texture Arrays)
Meta state that the rough guidelines for draw calls are 120-200 (at time of writing) on Quest 1. This is true for the most-part, but it is worth noting that not all draw calls are created equal!
If you are running a full, physically-based rendered project, you should expect the amount of draw calls to be less than 100 before you start losing performance, even on Quest 2. If you target exclusively Quest 2, with optimal settings (unlit shaders, no dynamic lights/shadows, no post processing), it is possible to hit 500 draw calls – but in real-world usage, 100-150 would be a good ball-park figure.
In Unity, the URP supports SRP Batching. This is a feature that allows optimizations around setpass calls, meaning that the cost of batches where objects share the same base shaders are smaller. You should enable SRP batching – it wont make any GPU difference, but it will aid in overall performance uplift as it less work on the CPU.
There is no such feature in Unreal Engine (as of writing).
You should make use of static batching wherever possible. For example, if you can batch just 10 objects together by atlassing them into one draw call, that is a saving of 7% of your draw call budget.
The best way to achieve this in Unreal Engine is through traditional atlassing and clever use of packing masks and textures.
In Unity, you have an additional option open to us: Texture Arrays. Packages such as One Batch make use of this, but you can roll your own solution. It requires tooling and workflow considerations.
Texture Arrays are 3D arrays of 2D textures (think of these assets like a “book of textures”, where each page number is a reference to a page/texture. The “w” component of your UVs (“uvw”) in the index into that array.
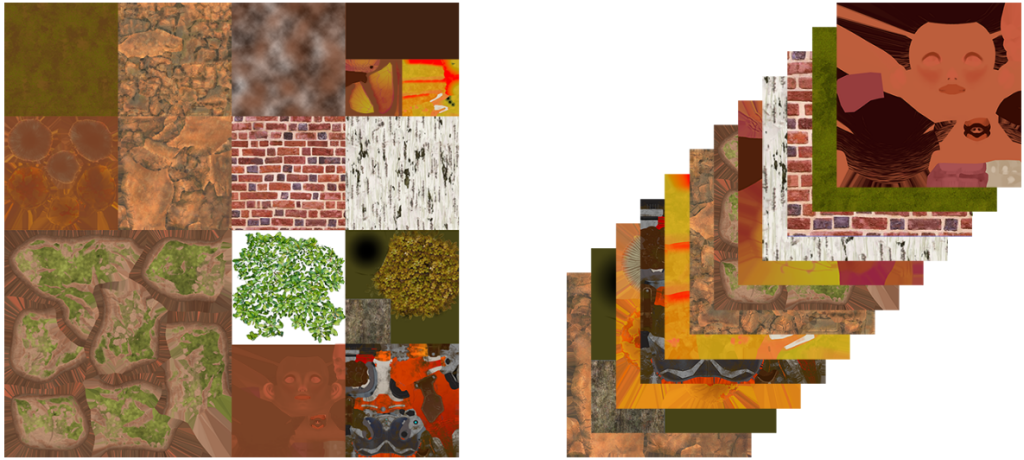
Left: Traditional atlassing, Right: Texture Array, showing stacked textures in a single asset
Lights & Shadows
Realtime
As we will be using a Forward Renderer on Quest, we are currently limited by the maximum number of lights.
Forward renderers will (essentially) perform a calculation for each draw call, for each pixel, for each light.
the formula is nObjects ^ nlights = ncalculations
This means that the cost for a single light, on a twenty objects, overlapping that pixel is:
20^1 = 20 calculations
… For three lights on twenty object, the cost is:
20^3 = 8000 calculations
So, for 3x more lights, we’re talking 400x the calculation cost, in this example.
It is therefore preferable to use as few realtime lights as possible, and this is why many games opt for an unshaded/unlit art style, as it is extremely cheap (it also means the surface shader is also cheap).
However!!
Unity’s URP 14 comes with “Forward+”. This is Forward rendering, but we also bin the lights – not just the geometry, in the tiled renderer. This essentially would unlock unlimited realtime lights, with the caveat of a per-camera light limit:

There is no per-object limit for the number of Lights that affect GameObjects, the per-Camera limit still applies.
The per-Camera limits for different platforms are:* Desktop and console platforms: 256 Lights
* Mobile platforms: 32 Lights. OpenGL ES 3.0 and earlier: 16 Lights.
This let’s you avoid splitting big meshes when more than 8 lights affect them.
Full realtime shadows are do-able on Quest, but again, there is a resolve cost as it writes the shadow depth map. It will also double up your draw calls for anything casting shadows.
Given you may already be restricted by draw calls, realtime shadows may be an expense too far.
There is an option of hybrid realtime shadows, but as of writing, I have never given it a try.
I would implement it slightly differently, by storing a “depth cubemap” from each fixed light source, and use that, in a shader, to compute shadows. It would allow realtime, non-self-casting shadows from static objects/lights.
To summarise – you should use as few dynamic lights as you can manage (ideally none, but up to 2 should be acceptable if those lights do not have much overlap). In Forward+, you can have more – just watch your camera limit.
Realtime shadows are an artistic choice, but come at a significant performance cost and will result in compromise somewhere else.
In Unreal Engine you have the additional option of capsule shadows – again, this requires an additional resolve/draw call, or mesh distance fields.
Baked
Instead of Realtime, you should aim to do as much offline baking of your lighting as possible. This is a fairly standard affair in Unity and Unreal for baking lightmaps, but there are some considerations around baked GI.
Baked GI can really help sell the illusion of dynamic lighting on dynamic objects without the cost of realtime lights. That said, both Unreal and Unity make use of light probes to do this.
Meshes are only affected by a single light probe, so getting the density correct can be tricky. If you have probes that are too far apart and have rapidly different values, it will cause flickering on meshes as they move from one probe’s influence to the other or unexpected results. In this example, the ambulance should be in a darker area, but due to light probe placement, it actually fully lit:
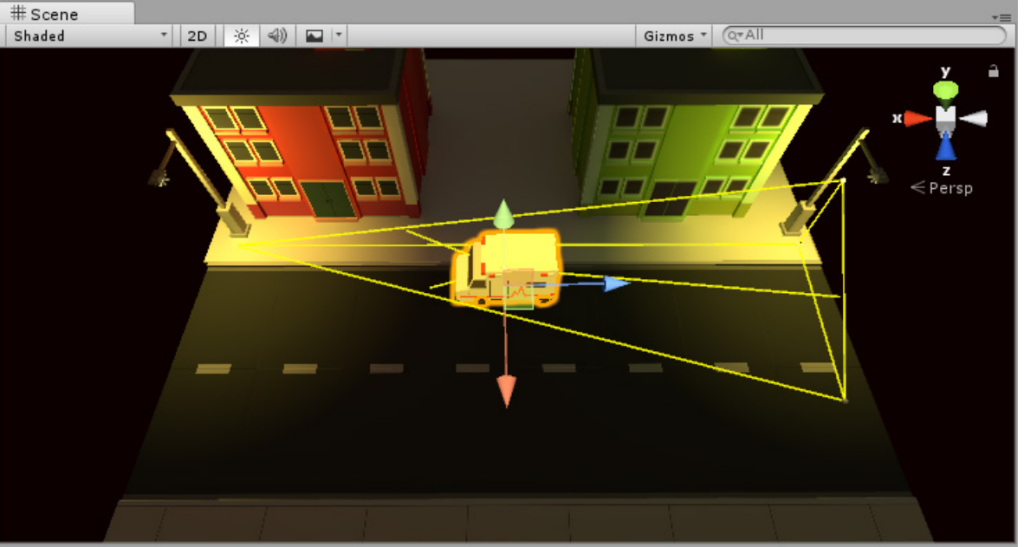
This ambulance should be darker…
Light Probes also come at a cost, as they are computationally quite expensive on Quest.
In newer versions of the URP, you can make use of the light volume, or use Bakery volumes. Bakery volumes will break your scene up into voxels/a 3D grid and bakes the directional light map into a 3D texture array. You can then simply sample this 3D texture using the world position of your pixel and get the dynamic GI values very cheaply. This comes at a modest memory increase over probes.
Unity Light Volume work in a similar way, but haven’t used this to a huge degree as they can’t be moved at runtime, which has issues for my current projects.
Application Space Warp
Application Space Warp (ASW) is a feature that Meta makes available that can increase available frametime – essentially doubling it. This means for a target framerate of 72fps, you only need to hit 36fps.
Before we get too excited, there are downsides…
- It doesn’t completely double available frametime as it uses a Motion Vector pass – this is an additional resolve. You get some frametime, but not double!
- It has issues with moving objects that pass over Transparent objects or are Transparent themselves – as these don’t write motion vectors. This can cause artifacting, particularly across UI elements and particles. You can’t realistically used any Transparent materials with ASW.
- It forces input to run at 36fps – this may mean that applications that are dependent on high input rates (low latency apps) will suffer.
- It (currently) doesn’t support versions of Unity that are required for other VR headsets (such as PSVR 2), so you may have issues developing for both platforms in Unity.
- Requires Vulkan (not a drawback, just to be aware)
If you can live with those drawbacks, it is a great way to almost double performance in your application.
You can enable and disable at runtime to balance hard-performing areas. It also uses the same shader pass names on Pico, so is cross-compatible with Quest and Pico.
LODing
You should LOD everything, aggressively. You shouldn’t just provide mesh LODs, but also use simpler materials at higher LOD levels and LOD particle systems as well. Cull at the closest distance you can get away. All surface textures and masks should use MIPmaps and as low resolution as you can. How small you need them depends on how many textures you have. The best way to check is to look at your memory usage.
You may find that your LOD distances do not match in Editor to what you see in the Headset in the build.
This happens because of the wider field-of-view in the headset. If you experience this, you can change your LODBias setting from 1.0 to 3.14 only in the headset, in a build and they will match what you see in the Editor.
High-vertex count objects really slow rendering, so aim for a consistent “vertex density” in your scenes using LODs.
Physics
Both Unreal and Unity use PhysX for mobile builds so have similar performance metrics. Mesh collision is fine, as long as it is optimised and only used on static objects – don’t use it on dynamic objects where possible.
On Quest devices, it is recommended to have no more than 15-20 dynamic physics objects active at any time. CPU utilisation will become too high if you exceed this range.
Avoid using CharacterController.Move – if you have to use it, call it only once-per-frame by bundling the total move amount together.
Textures
Textures must be compressed with ASTC. This is the best trade-off for performance/size and is recommended by Meta. Using anything else may impact performance.
ASTC is slow when compressing, so bulk compression of textures can take some time.
As mentioned in LODing, you should aim to use as small texture sizes as you can get away with for your art style – the main aim is to limit memory usage, so profile your memory usage.
If your application is within frame and has a lot of memory budget, you can consider adding higher-resolution textures if you wish. Do not use textures greater than 2028 x 2048, use platform-specific overrides if you wish to import 4k textures.
Occlusion
Occlusion culling works for the most part, but it isn’t free. On previous projects, it was about a 1.5ms cost. This means that you need to be culling enough to justify having it on.
Unreal Engine
Additionally, in Unreal Engine, Quest supports Hardware Occlusion Queries and is enabled by default, however, check performance on your project as it requires a depth pre-pass (a resolve cost). You can fall back to Software Occlusion Queries in this case. You also have Round Robin Occlusion available that saves an entire frame’s worth of occlusion queries for one camera. If you are draw call or visibility-bound, this may be worth enabling.
Resolution
You should aim for the Native Resolution of the headset, using MSAA as your anti-aliasing solution. MSAA is very low-cost in a forward renderer and gives you Alpha-To-Coverage at almost no extra cost.
You can do higher resolution scaling for a cleaner result, but this isn’t a requirement for Quest VRCs. You can run at lower resolutions if you need to, but use sparingly as the Quest’s resolution isn’t fantastic to begin with.
To note: Unity’s internal resolution scaling (in the URP) for Quest is incorrect by default for versions 2021 or older. You should increase the resolution scaling in increments, using OVR Metrics to find out the exact resolution – in URP 13, Render Scale of 1 is 95% native resolution.
Fixed Foveated Rendering (FFR) is available in Unity and Unreal and you should seek to enable this in your project. This technique downsamples the peripheral areas of the screen to make rendering these sections faster.
The documentation linked describes the process and details well, but there are some important things it mentions that are worth repeating here:
- FFR levels can be changed on a per-frame basis and should be changed according to the content being displayed. […] However, avoid changing FFR levels frequently within the same scene without another transition as the jump between FFR levels can be fairly noticeable.
- Foveation is more apparent and noticeable in bright/high contrast scenes, and with higher frequency content such as text. […] Medium should be a suitable FFR level in most cases, but low is a good option if there is performance to spare. High and high top should be reserved for cases where the extra performance is really needed.
FFR requires Vulkan to be the rendering API.
Particle Systems
The same rules as above apply to particle systems:
- LOD heavily
- Avoid Transparency (use opaque meshes if you can)
- Use as fewer particles as you can in any given particle system
- Avoid lots of different materials and particle systems, this will add draw calls
- Don’t rely on Bloom and other post processing – find other ways to fake where possible
- Avoid GPU particles – we generally don’t have the GPU overhead for compute shaders needed for GPU particle physics.
That’s it!
Vertex & Triangle Counts
Triangle counts are not really relevant in modern graphics APIs. Vertex counts are the most important aspect. Quest headsets will manage 200,000 vertices just fine, and anything over 300,000 vertices should be avoided.
The system can handle up towards 500,000, but everything else in your graphics pipeline (shaders, textures) would need to be minimal. Aim for 200,000.
As mentioned earlier in this document – try to LOD aggressively and break large/dense meshes up. It will add to draw calls, but will reduce overall binning times, which are more significant.
Where vertex counts really… count (sorry) is on characters. Each vertex that is skinned takes time – a 50k vertex character will take just as long to perform skinning calculations as 5x 10k vertex characters.
It is worth noting that UVs are also included in vertex count metrics, as well as hard edges.
Here are some examples:


Bones & Animation
Fundamentally there aren’t any restrictions on what you can put in your application, as far as animation is concerned, as long as you are sensible.
As ever, optimise and compress as much as you can on your animation data, using as few bones as you can. Don’t expect AAA facial animation with 40 bones in a face and expect good performance.
Be moderate with your expectations.
In previous projects, and anecdotally, any more than 4 or 5 skinned, animated & AI driven characters start to slow things down. Every fractional milisecond you save on character overhead, is more characters you can fit on-screen. Arizona Sunshine has a lot of NPCs, and they managed it by keeping things cheap.
Avoid Blendshapes, these are supported but are expensive.
4 bones per vertex or less is recommended (but again, use as few as you can manage).
If you are GPU-bound, do not use GPU Compute Skinning, do the skinning calculations on the CPU. The reverse is also true.
User Interface
There are several GUI systems available to us in Unity, it is important to understand that each can impact performance in its own way.
Unity GUI (UGUI) is slow:
- Canvas elements can take time to compute – they will compute even if the opacity of all elements is 0. You must turn off all renderers you don’t need to see
- In certain modes/settings (world-space), it will render the UI to a RenderTexture. This is a blit and a resolve.
UI Toolkit I have no current metrics on – haven’t used it.
Diegetic UIs are fantastic for VR – they can add some great immersion and don’t require render textures or blits. Vacation Simulator is a great example – the options menu is a bag:

The Exit button is a sandwich you have to eat in two bites to exit.
Further Reading
Song in the Smoke: Simultaneous VR Development for Desktop and Mobile GPUs
Down The Rabbit Hole w/ Oculus Quest: Developer Best Practices + The Store
Showdown on Quest Part 2: How We Optimized the PC VR demo for Meta Quest 2
SUPERHOT VR on Quest: From 100W to 4W in 12 Months
Post Processing and Rendering in VR with Unity URP: A Shooty Skies Overdrive case study
Games to look at:
These are all great showcases of the possibility on Quest, and also its limitations
Red Matter 2 – Technical Showcase l Meta Quest
This game looks great, but it has no additional NPC characters (beyond talking heads), the environments are very samey/not very interactive. Built in Unreal Engine 4, uses 91% native resolution
Assassin’s Creed Nexus VR – Official Gameplay Trailer
This is what a AAA studio budget will get you. Notice how its not particularly groundbreaking visually – but it does the job. They look to have done a good balance of open-world within the confines of the hardware.
Peaky Blinders: The King’s Ransom VR FULL WALKTHROUGH [NO COMMENTARY] 1080P
Good character/NPC count, hero characters, detailed environments. Could have benefitted from a full time VFX artist and a longer time to polish, but a great showcase for the Quest.
Vacation Simulator | ALL MEMORIES | Full Game Walkthrough | No Commentary
A game that prioritises gameplay over flashy visuals. Doing so allowed them to create really rich, interactive worlds. Characters are boxes, just about everything is vertex-lit with almost no textures. Worth a look just to see what happens when you go away from “AAA” graphics approach
Arizona Sunshine VR Oculus Meta Quest 2 VR Gameplay – No Commentary
Not a visual showcase, but its always good to compare. Very simplistic “realistic” art, but the core gameplay is great and gives them overhead for quite a few characters.
DUNGEONS OF ETERNITY is my new favorite VR game.
Great showcase of what good combat and animations looks like in VR. Enemies aren’t health sponges, combat is satisfying, throwing weapons feels great and having weapons automatically return to holster works well. My only gripe with this game is how dark the environment is, which heavily strains my eyes and gives me a migraine.


